Unlock the Power of AI Writing in WordPress with Assistini

Writing compelling blog posts, product descriptions, or landing pages traditionally requires time, creativity, and SEO know-how. But what if you could accelerate this process significantly while maintaining quality? Discover the power of AI Writing directly in your WordPress dashboard.
Enter Assistini, a powerful AI-driven WordPress plugin designed to be your ultimate digital co-pilot. Assistini leverages cutting-edge AI language models to help you write, rewrite, and optimize your content directly inside the WordPress editor. Whether you’re a beginner blogger or an experienced content creator and marketer, Assistini’s structured writing tools and customizable templates allow you to create posts rapidly without sacrificing clarity or SEO performance.
This comprehensive guide will walk you through everything Assistini offers and how it can transform your content creation workflow. We’ll cover how to install it, explore its innovative writing modes, and provide detailed, step-by-step examples with screenshots and videos to showcase its capabilities. By the end, you’ll have all the insights to unlock the power of AI writing within WordPress and create publications that rank well and resonate with your audience.
What is Assistini? Key Features and Benefits
Assistini is an AI-powered plugin built specifically for WordPress, offering seamless integration with the native editor. It combines advanced language models with smart content structuring tools to help users at every stage of the writing process—from idea generation to final SEO optimization. Some of the main features include:
- Structured AI Writing: Assistini guides you through a step-by-step AI-assisted workflow across six stages, enabling you to plan, organize, and draft your blog posts systematically. This ensures well-thought-out and coherent articles.
- Quick Guide Mode: For those who prefer speed and simplicity, Assistini’s Quick Guide lets you fast-track your post creation in just five AI-powered steps. No overthinking—just efficient results.
- Custom Prompts: Enter your own prompts to tailor AI-generated content precisely according to your needs. This level of customization helps maintain your unique brand voice.
- Customizable Templates: Whether you need specific text lengths, styles, or structures, Assistini offers ready-to-use templates and allows you to create your own, ensuring consistency across your posts.
- AI Editor Assistant: Optimize your drafts directly in WordPress with AI tools focused on text quality, structure, SEO, and keyword integration. This makes editing painless and efficient.
How to Install and Integrate Assistini with WordPress
Getting started with Assistini is straightforward. Here are the steps to install and activate the plugin:
- Log into Your WordPress Admin Dashboard: Navigate to your WordPress admin area.
- Access the Plugin Repository: Click on “Plugins” > “Add New.”
- Search for Assistini: Use the search bar to find the Assistini plugin.
- Install and Activate: Click “Install Now” and then “Activate” once the installation completes.
- Configure the Plugin: Access Assistini’s settings to connect your AI credentials (if required), set default writing modes, and customize templates.
Once installed, Assistini integrates directly into the WordPress editor, ready to assist whenever you create or edit posts.
Writing Tools in Assistini: Step-by-Step Walkthrough
Assistini offers different AI-powered writing tools to suit a variety of workflows and preferences:
1. Structured Writing Mode – From Blank Page to Brilliance
The Structured Writing mode in Assistini is your step-by-step AI workflow that helps you plan, structure, and write blog content—from scratch to full draft—without getting stuck. It’s perfect when you have a topic in mind but want a little help shaping it into a solid, well-organized blog post.
Assistini guides you through six stages that help with planning, drafting, refining, and polishing your content. Each stage includes detailed AI prompts and suggested content ideas to build a well-structured blog post. In each step you can add or change any input you wish. Assistini will then draft an outline of your post and when you are happy with the suggestions, your complete post will be created in seconds, ready for a swift transfer to your editor, including meta tags and keywords.
3 Stages of the Structured Writing Mode
- Brainstorm & Outline
- Assistini will generate topic ideas, key themes and content angles for you to choose from.
- Adapt your target audience, tone and style.
- At any point, tweak or expand your inputs to refine the direction.
- Refining Outline Draft
- Based on your inputs, Assistini instantly creates a clear, logical outline.
- Review, rearrange or add sections until it’s exactly what you need.
- Lightening-Fast Full Post Creation
- Once your outline is approved, Assistini writes the full article in seconds.
- Delivers a ready-to-publish draft—complete with headlines, subheads, meta tags and SEO keywords—for seamless transfer into your editor.
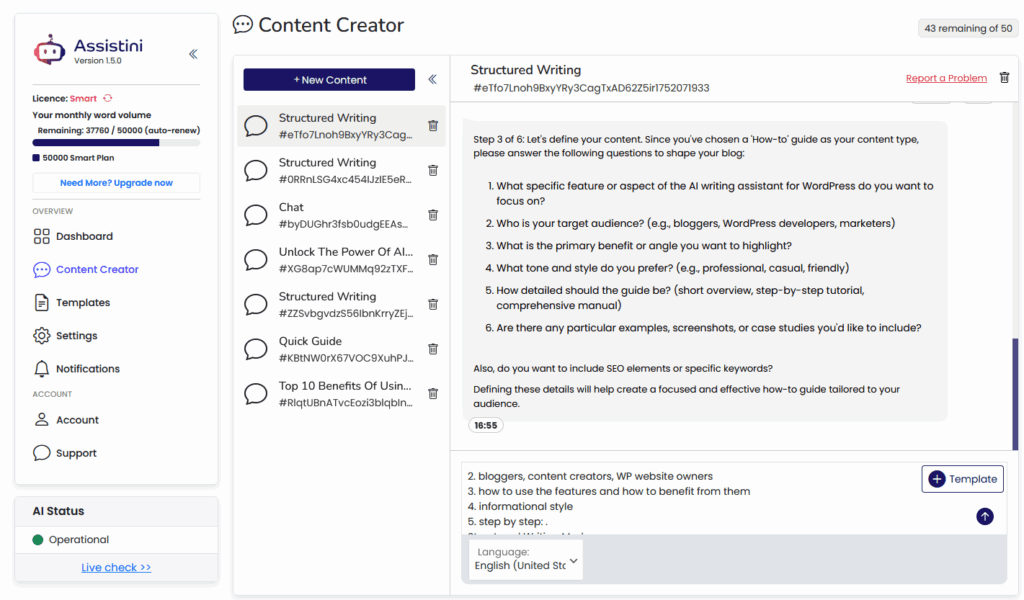
Example Screenshot: Step 3 – Drafting the Main Content
Here’s how it works:
Step 1: Pick your topic
Just tell Assistini what you want to write about—like “Social Media Trends 2025”.
Step 2: Choose your format
Listicle, how-to guide, case study, opinion piece—whatever fits your idea. You can even describe your own structure if you want something custom.
Step 3: Add your details
This is where you define your audience, tone, keywords, and any specific points you want included. Don’t worry—you can skip anything you’re not sure about.
Step 4: Get your outline
Assistini generates a clean, logical outline for your post. Tweak it or move on—it’s your call.
Step 5: Choose a title
You’ll get 10 headline options tailored to your topic and SEO focus. Pick your favorite or add your own.
Step 6: Create your draft
With everything in place, Assistini writes the full post for you—ready to edit, format, or publish straight in WordPress.
Why use Structured Writing?
Because it takes the guesswork out of content creation. You’re guided through all the key decisions—topic, format, keywords, structure—so your post is on point from the start. Plus, it’s built right into WordPress, so there’s no jumping between apps.
Bottom line:
Structured Writing helps you go from vague idea to polished post—without the overwhelm. It’s like having a smart content strategist built into your blog editor.
Tip: Detailed walk-through of the Structured Writing Feature.
2. Quick Guide – Your Blog Post in 5 Clicks
If you do not start from a blank page, but have a more substantial idea in mind, the Quick Guide mode simplifies the process to five streamlined AI-driven steps. It prioritizes speed without compromising on content quality, perfect for producing publish-ready drafts quickly.
Here’s how it works:
- Tell Assistini your topic
What’s your post about? Just enter something like “Social Media Tips for Online Shops”—that’s your starting point. - Pick your audience
Whether you’re writing for marketers, shop owners, or tech newbies, Assistini will match the tone and structure to fit. - Choose a focus keyword
This helps the AI optimize your post for search engines right from the start. - Add your own ideas (optional but powerful)
Have a few key points, examples, or even a product to mention? Drop them in and Assistini will work them into the post. - Click “Create” and let the AI do the writing
You’ll get a complete draft in seconds—no switching tools, no copy-paste. The content drops straight into your WordPress editor and is ready for you to tweak, format, and publish.
Need recurring content?
You can save your favorite settings—like tone of voice, post length, or structure—as templates. That way, your next post is even faster to create.
3. Custom Prompts – Total Control, Your Way
Got your own plan for a blog post and don’t want to follow a fixed workflow? If you are more experienced with AI writing, then Custom Prompts is the feature for you. You can input your own detailed prompts, letting Assistini generate content tailored exactly to your specifications. It’s the most flexible way to work with Assistini: just open the chat, type your instructions, and let the AI write exactly what you ask for. This is great for unique content needs or when experimenting with new ideas.
Here’s how it works:
Just type a prompt like:
“Write a blog intro about why local SEO is crucial for small businesses in 2025.”
…and Assistini will generate content based on your instructions. Want to tweak it? Ask for a different tone, restructure a section, or add more details—it’s a back-and-forth conversation, and you stay in full control the whole time.
Perfect for when you:
- Know exactly what you want to say
- Prefer to give your own detailed prompts
- Are working on unique or non-standard content
- Don’t want to be guided through steps—just write and go
Want to speed things up?
You can save and reuse custom templates with your standard prompts, or grab one of Assistini’s pre-made ones. It’s great for recurring tasks like intros, product blurbs, or FAQs.
What about SEO?
Easy—just add SEO instructions to your prompt (e.g., “Use the keyword ‘AI marketing trends 2025’ three times”). You can also fine-tune everything later with Assistini’s built-in SEO tools.
Bottom line:
If you like having full creative freedom, love giving detailed instructions, or just want to skip the hand-holding, Custom Prompts is your creative playground—right inside your WordPress dashboard.
Tip: Detailed walk-through of the Custom Prompts Feature and how to use it.
4. Templates – Your Shortcut to On-Brand Blog Content
With Templates in Assistini, you don’t have to start from scratch every time you write. Use ready-made system templates designed for common tasks like writing headlines, meta descriptions, or product descriptions. You can also design your own templates to enforce consistent voice and structure across all your posts.
Just save your preferred tone, length, structure, and writing style once—and reuse it whenever you want. Whether you’re working in the Quick Guide or chat mode, templates help you keep your content consistent and save serious time.
Works perfectly with Custom Prompts
If you’re comfortable writing your own prompts, you can store them in a template and reuse them whenever you need. It’s the ideal add-on for experienced users who want full control and efficiency.
Or, if you want Assistini to mimic your existing blog style, just drop in a sample post as part of the template. Then all you have to do is tell Assistini your next topic, and it will follow your tone and structure automatically.
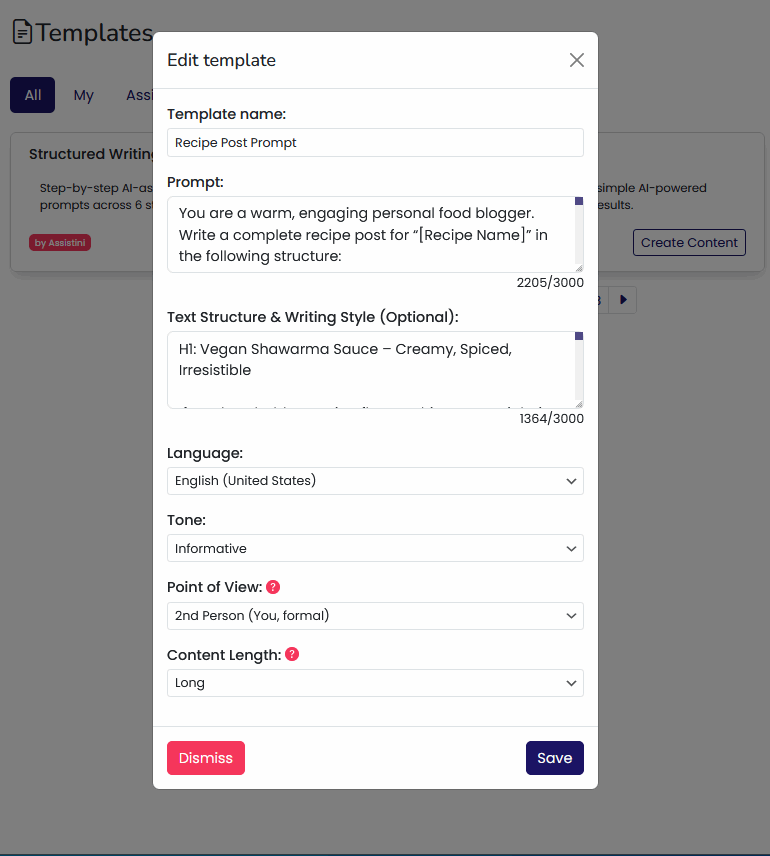
How it works:
Go to the Templates section in your Assistini dashboard.
Use a built-in one or click + Create Template to build your own.
Apply it when you start your next post—and you’re good to go.
Why it matters:
Templates help you write faster, stay on brand, and create blog content that sounds like you—every single time.
Tip: Detailed walk-through of how to use templates for your AI prompts to speed up your creativity.
5. AI Editor Assistant – Smart Edits, Right Where You Write
Already have a draft—or an older post that needs a refresh? The AI Editor Assistant is your built-in writing partner inside the WordPress editor. It helps you improve, rewrite, and optimize your blog content as you work—no switching tools, no copy-paste chaos.
What can it do?
Pretty much everything. With just a few clicks, you can:
- Generate eye-catching blog titles
- Write or rewrite intros and CTAs
- Expand or tighten paragraphs
- Turn messy text into bullets or checklists
- Create meta titles and descriptions for better SEO
- Add FAQs, summaries, examples, and more
- Get keyword suggestions or use the Content Optimizer to boost readability and ranking
How does it work?
Just pick a tool from the Assistini panel in your post editor. Everything happens right there—in the block editor. No jumping between tools, no workflow interruptions.
Works great for…
- Updating existing blog posts
- Polishing new drafts
- Boosting SEO on the fly
- Clarifying complex content
- Making your posts more engaging and easier to read
Bottom line:
The AI Editor Assistant helps you turn decent drafts into standout blog posts – review and finetune all content with AI’s assistance before hitting publish – without ever leaving WordPress.
Tip: Detailed walk-through of the AI Editor Assistant.
Benefits of AI Writing in WordPress
- Accelerated Content Creation: Write full-length blog posts in minutes instead of hours.
- Improved SEO: AI-driven keyword suggestions and meta descriptions help your posts rank higher.
- Consistency and Quality: Templates and writing modes ensure your content stays polished and on-brand.
- Ease of Use: Seamless integration means no need to switch platforms; work entirely within WordPress.
- Flexibility: Custom prompts and templates enable personalized content creation for any niche.
Tips for Maximizing AI Effectiveness
- Experiment with all writing modes to find what suits your style best.
- Use custom prompts to maintain a unique voice.
- Regularly update templates based on performance and feedback.
- Combine screenshots or videos with AI-generated text for richer posts.
- Always do a human proofread to ensure nuance and accuracy.
Conclusion
Assistini truly unlocks the power of AI writing in WordPress, helping bloggers, marketers, and businesses create high-quality, SEO-friendly content faster than ever before. From its structured workflows to customizable templates and smart editor tools, Assistini streamlines every step of the writing process. By adopting Assistini, you can focus more on your ideas and audience while letting AI handle the heavy lifting of content creation.
Ready to take your blogging to the next level? Install Assistini today and start experiencing effortless, high-speed writing and optimized publishing right inside your WordPress site.

Melanie Tamblé ist Mitgründerin und geschäftsführende Gesellschafterin der Adenion GmbH, seit 2000 ein Pionier in Business Software Solutions. Als Expertin für Online Marketing und Digital Business führt sie nun die Integration von KI in digitale Workflows an. Mit dem Assistini KI Portfolio für Unternehmen bietet die Adenion smarte Tools für KI-Wissensdatenbanken, smarte Entscheidungsprozesse, Compliance Audits und Content Creators.