From Prompt to Publish in Minutes: How Assistini AI Templates Turn Any Post Into a One-Click Workflow

If you draft in one app, paste into WordPress, fix headings, then hop to another tool for SEO—you’re burning time on hand-offs, not creating. Assistini fixes this by living inside WordPress: you write with your own AI prompts, generate the draft, polish SEO where you publish, and ship—no copy-paste, no broken formatting.
Templates make that speed repeatable. A template captures your voice, structure, and rules once. Next time, you select it, add only the changing details (topic notes, links, data), and you’re ready to publish in the same flow. Templates work for any post type—tutorials, feature releases, case studies, press updates, and (as our example shows) recipes.
What you’ll get from this guide
- An AI prompt template for a universal post you can save in Assistini for any topic
- A step-by-step walk-through of the full AI prompt workflow in WordPress (with screenshot placeholders)
- The complete example AI template prompt (full text) before we add post-specific inputs
- A real-life example showing exactly what to paste when you create a new post
- Quick troubleshooting and a pre-publish checklist
Part 1 — Save a Universal Post AI Prompt Template (copy → adapt → reuse)
Create this once under Assistini → Templates → + Create Template. It mirrors the Custom Prompts blueprint and bakes in acceptance criteria so first drafts land closer to done.
Good to know: Template-level settings—Language, Tone, Point of View, and Content Length—are saved in the template and applied automatically. You don’t need to repeat them in your content prompt when the template is used.

AI Prompt Template (generic, for any article)
You are an expert content writer. You create professional blog posts for the blog  “[URL]” about "[Main Topic/Main content of the site]". Create a publish-ready blog post for “[Audience]”.

Goals
- Outcome: [newsletter sign-ups | demo requests | social shares | time on page], depending on the current topic

Structure
- H1: Compelling, keyword-rich title
- Lead: 1–2 sentences that state the value for the reader (use the primary keyword naturally)
- H2: Why this matters (brief context)
- H2–H3: Main sections with subsections (short paragraphs + bullets where helpful)
- H2: Practical takeaways (2–5 bullets)
- H2: Next steps / CTA (one clear action)

Voice & Style
- Clear, practical, no hype. Avoid jargon. Use concrete examples.
- Short paragraphs (3–5 sentences). Scannable H2/H3s.

SEO
- SEO-optimized article with natural inclusion of primary keyword, mixed with secondary keywords and synonyms.
- Include a 150–160-char meta description and a short URL slug.

Acceptance Criteria
- Output in Markdown with H2/H3
- Include a scannable summary list after the first section
- End with a single-sentence CTA

Notes/Inputs
- Use notes, links, or data if provided
Set Language, Tone, Point of View, and Content Length in the template once—these will auto-apply whenever you use it. Save.
Part 2 — Full Walk-Through with a Real-Life Example
We’ll demonstrate the same workflow using a recipe post template because it’s familiar. The template mechanics are identical for tutorials, features, and case studies.
Step 1: Start from your saved prompt template
→ use this complete example AI prompt template and adapt
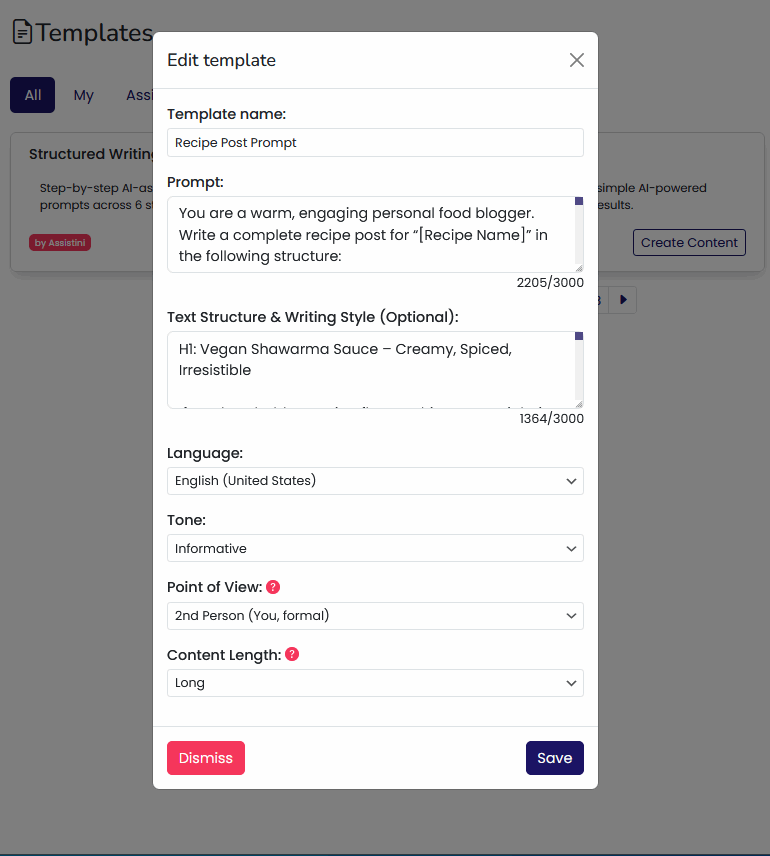
Open Assistini → Templates → + Create Template (or edit your universal template). This is an entire example prompt template that is pasted into the Prompt field, followed an example post pasted in the Text Structure & Writing Style.
This is the full version we’ll use for the walk-through.
Example AI prompt template for a recipe post
PROMPT
You are a warm, engaging personal blogger.
Write a complete blog post for “[Post Title]” using the structure below.
Use grams for all measurements; if cups are given, keep them in brackets after grams.
Keep the tone friendly and personal, like chatting with a friend.
Avoid generic AI phrases. No “welcome to my kitchen,” no childhood nostalgia.
Write naturally and vividly.

TEXT STRUCTURE & WRITING STYLE
1) H1: [Post Title]
   - Create a catchy, keyword-rich SEO title that naturally includes “[Primary Keyword]”.

2) Lead (2 sentences)
   - Short, SEO-optimized summary including the primary keyword.

3) Long Introduction & Storytelling
   - Start with an evocative scene or moment of inspiration (no childhood/family tropes).
   - H2: Why this is special
     Explain the origin, seasonality, who inspired it, or a fun mishap that made it better.
   - H2: Key ingredients or key elements
     Describe colors, aromas, textures; mention sourcing, seasonal notes, or cultural meaning.

4) H2: [Post Title] — The Core
   - Short hook line: “[Post Title]: [one-sentence value or flavor note]”

5) H3: Ingredients / Materials (rename to fit your post type)
   - Bullet list with precise amounts in grams (cups in brackets).
   - For special items, add a brief note on why you use that variety.

6) H3: Instructions / Steps
   - Numbered, step-by-step directions.
   - Add technique tips in parentheses where useful (e.g., “(gently fold to preserve airiness)”).

7) H3: Serving / Usage Tips (rename to fit)
   - Sides, garnishes, or practical usage and finishing touches.

8) H3: Variations / Alternatives
   - 2–3 simple twists (e.g., vegan swap, smoky version, extra heat; or for non-recipes: different angles/formats).

9) H3: Storing / Aftercare
   - Fridge/freezer guidance, shelf life, best reheating/refresh method (or maintenance/adaptation notes for non-recipes).

10) Call-to-Action
   - Invite readers to comment with tweaks, tag @lecker.life with photos (or analogous handle), and subscribe.

SEO
- Primary keyword: “[Primary Keyword]” (use naturally 2–3×)
- Include a 150–160-character meta description and a short URL slug.

ACCEPTANCE CRITERIA
- Output Markdown with H2/H3
- Include a scannable 5-bullet summary after the first main section
- End with a single-sentence CTA
Reminder: Set Language, Tone, Point of View, and Content Length in the template settings—they’ll apply automatically whenever you use this template.
Save the template.
Step 2: Pick template from library and add only the content specifics (the template handles the rest)
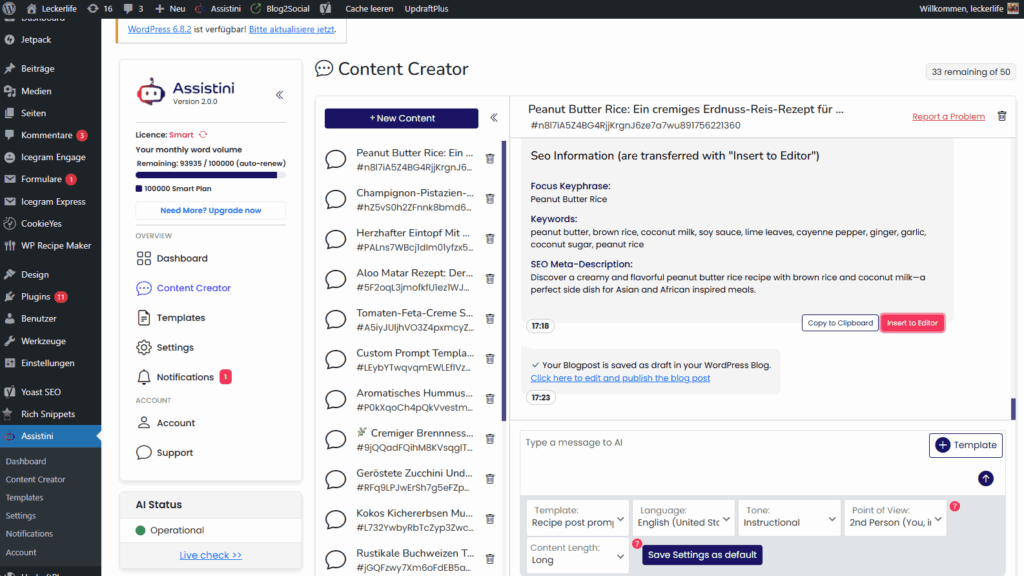
Next, select your preferred template from the template library and click “Generate Content”
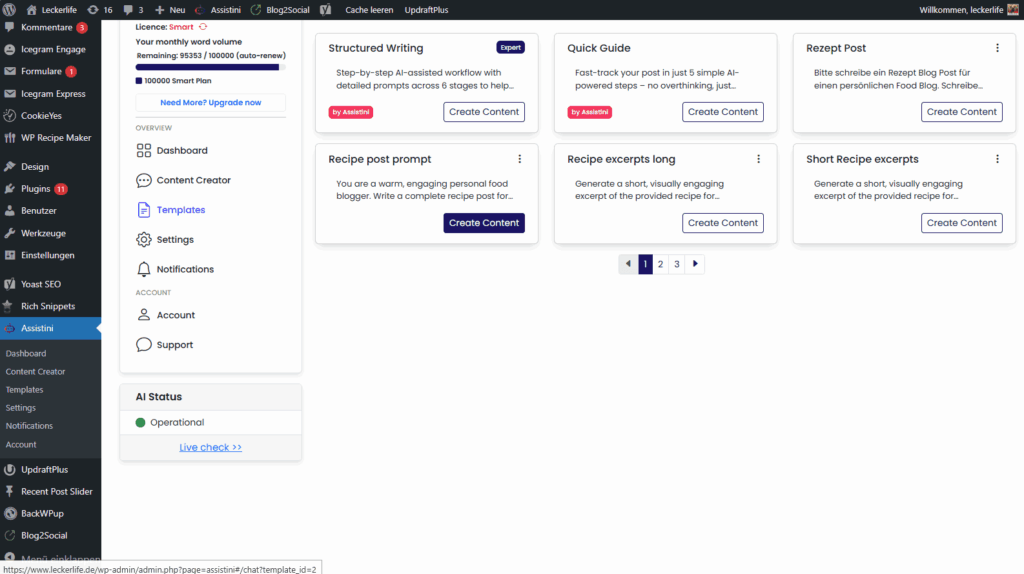
When you click on “Generate Content” the Custom Prompt chat window will open. You can see and check the general settings of your template at the bottom of the chat.
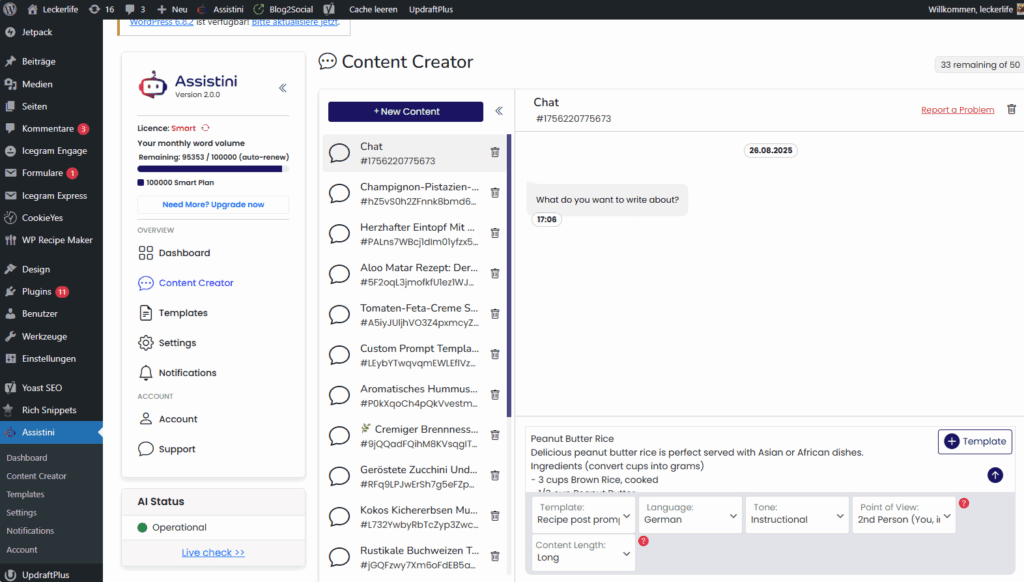
Because Language, Tone, POV, and Length are already saved in the template, you only paste the changing details for this post.
Real-life example — create a new post using the template
Write or paste the specifics for your new post based on the template into the Content Creator chat and click on the arrow button to generate the post.
Post Title: Peanut Butter Rice
Audience: Home cooks looking for quick sides
Primary Keyword: peanut butter rice

Lead (1–2 sentences):
Delicious peanut butter rice finished with coconut milk and lime leaves—perfect with Asian or African dishes.

Notes/Inputs (use grams; if cups are given, keep them in brackets):
Ingredients:
- 3 cups Brown Rice, cooked
- 1/3 cup Peanut Butter
- 3/4 cup Coconut Milk (or water/peanut milk)
- 3 tbsp Soy Sauce
- 1/4 tsp Ground Ginger
- 1/2 tsp grated Garlic
- 1 tsp Coconut Sugar
- 2–3 Lime Leaves
- Pinch of Cayenne Pepper (2–3 dashes)

Instructions:
- Cook the rice (stovetop or rice cooker).
- Simmer remaining ingredients 4–5 minutes on medium-low, stirring until slightly thickened.
- Combine sauce with hot rice and serve.

Extras:
- Add 3 plating/serving ideas, 2 variations, and storage tips.
- Include a 150–160-character meta description and a short URL slug.
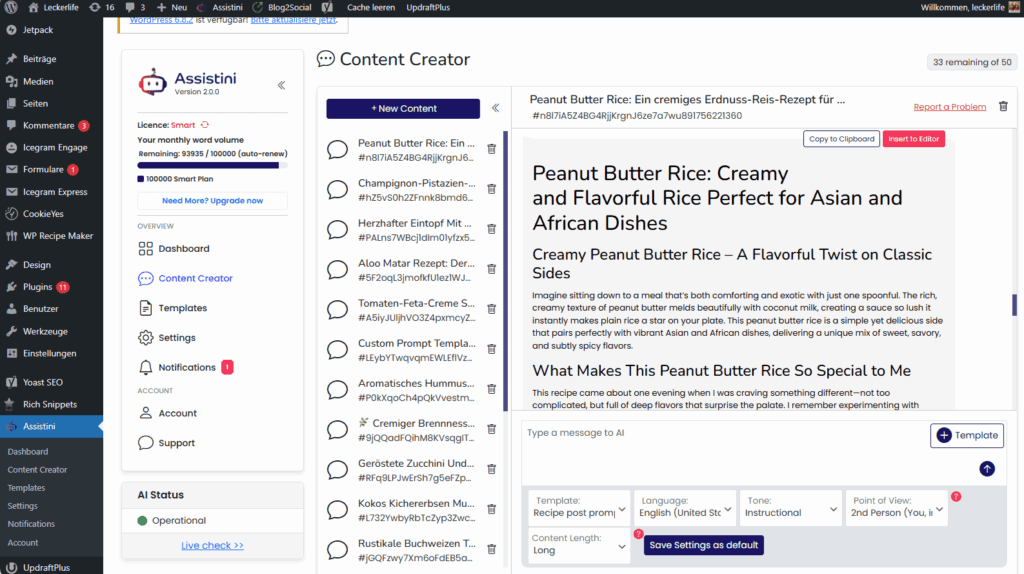
Assistini applies your template’s structure and style to produce a long-form draft.
If needed, iterate right here:
“Tighten the lead to two sentences with the primary keyword.”
“Ensure all measurements are grams; keep cups in brackets.”
“Give me two alternative intros—keep the one with stronger sensory detail.”
Check SEO information at the bottom of the generated post – these will be automatically transferred to the corresponding editor fields.
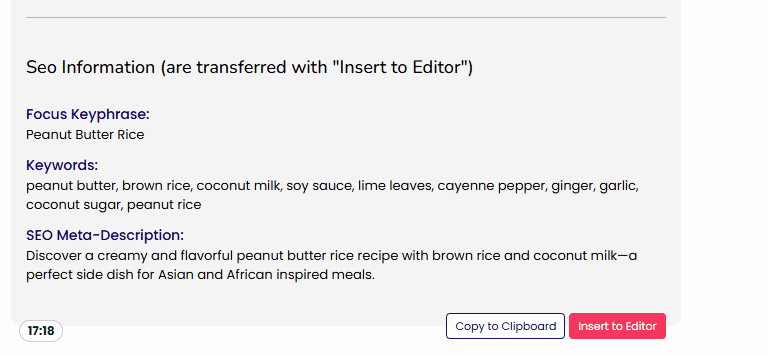
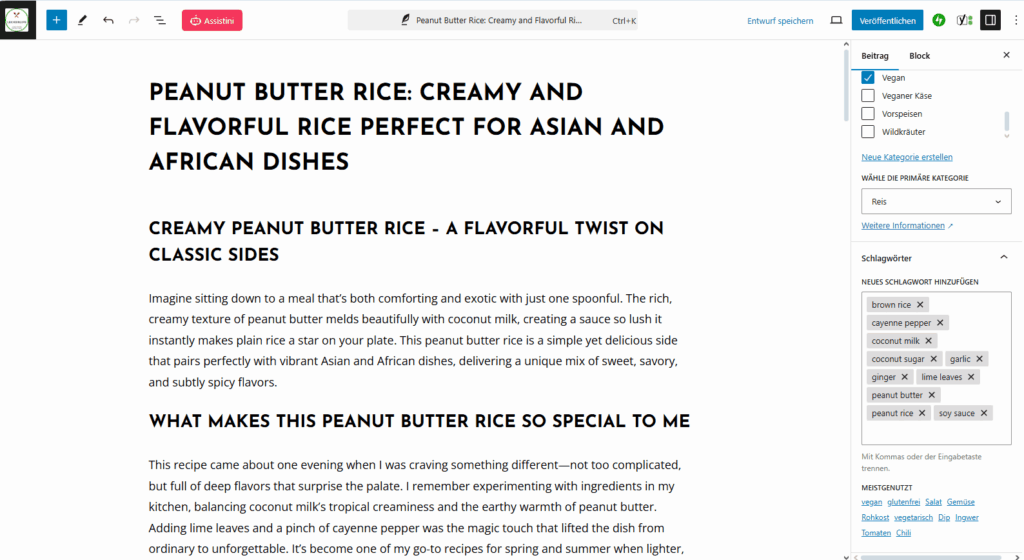
Step 3: Click to transfer content + SEO to the WordPress editor
When the draft looks right, click Insert to Editor. Assistini sends the body copy and SEO payload (focus keyphrase, keywords, meta description).

Step 4: Final polish & publish
In the WordPress editor, skim for:
- H1/H2/H3 readability and natural keyword placement
- Meta description length (~155 characters)
- Slug, category, tags, and internal links to related posts
Publish or Schedule. Done—without ever leaving WordPress.
Use the same AI prompt template for any post type (swap the inputs, keep the system)
- Feature Release (SaaS):
Post Title: Quick Guide Mode for WordPress
Audience: WordPress creators
Primary Keyword: AI for WordPress
Notes: problem → what’s new → who benefits → setup steps → impact → single CTA. - How-To Tutorial:
Post Title: Migrate Your Blog to a New Theme Without Breaking SEO
Notes: prerequisites, numbered steps, pitfalls, checklist, 60-second summary, single CTA. - Case Study:
Post Title: How X Increased Organic Traffic in 60 Days
Notes: baseline, approach, results (numbers), screenshots, lessons learned, single CTA.
Same template, same flow—only the Notes/Inputs change. The template’s saved Language, Tone, POV, Length do the heavy lifting every time.
Troubleshooting for your AI prompts templates (quick fixes)
- Output feels generic → Paste a short writing sample (6–8 sentences) into the template’s “Text Structure & Writing Style” field and add stricter acceptance criteria (e.g., “include 2 numbered examples with approximate numbers”).
- Units inconsistent → Add a rule to the template: “Always output grams; if cups are known, include in brackets.”
- Voice too formal → Set template Tone to Instructional or Friendly and add cues: “short sentences, no buzzwords, concrete verbs.”
- Sections missing → Lock the order in the template and say “no extra sections.”
Pre-publish checklist for your final post (60 seconds)
- Human-sounding H1 with primary keyword
- Lead states the value in 1–2 sentences
- H2/H3 scan cleanly; a summary list appears after the first main section
- Meta description ~155 chars with the keyword once
- Slug short; categories/tags set; internal links added
- Images have descriptive alt text
Summary
If you’re juggling multiple apps to draft, edit, optimize SEO, and publish content, Assistini streamlines your workflow by living right inside WordPress. You write with your own prompts, generate drafts, polish SEO, and publish—all without the hassle of copy-pasting or formatting issues.
By creating reusable AI prompt templates that capture your voice, style, structure, and rules once, you can simply select a template for any post type—whether it’s a tutorial, feature release, case study, or recipe—add the specific details for that post (like topic notes or links), and publish quickly in one smooth flow.
Ready to speed up your WordPress content creation?
- Save the Universal Post AI Prompt Template, then try it on your next article—tutorial, feature update, case study, or recipe.
- Select the template → paste your specifics → Generate → Refine → Insert to Editor → Publish.
- One repeatable motion, right inside WordPress.
→ Get started now with Assistini

Melanie Tamblé ist Mitgründerin und geschäftsführende Gesellschafterin der Adenion GmbH, seit 2000 ein Pionier in Business Software Solutions. Als Expertin für Online Marketing und Digital Business führt sie nun die Integration von KI in digitale Workflows an. Mit dem Assistini KI Portfolio für Unternehmen bietet die Adenion smarte Tools für KI-Wissensdatenbanken, smarte Entscheidungsprozesse, Compliance Audits und Content Creators.